Cooking Rice

IMG_5128

I’m often surprised how many people ask me about cooking rice in their Thermomix.   There have been a few different time/temperature/speed variations in the Everyday Cookbook over the years   I always cook rice in my Thermomix using the method outlined below with 100% success.  I used to have a rice cooker, but gave it to the op shop a few years ago!  Rice cooked in your Thermomix is perfectly cooked & fluffy every time.  Whether I’m cooking 100g or 400g of rice, I always use this method.  If you’re cooking rice to accompany a meal, the recommendation is to allow approximately 70g raw rice per person.  After a few goes, you will work out how many grams of rice to cook for your family meals (allowing for big eaters or kids) without having any wastage or not enough.

Cooking White Rice

up to 400g white rice
900g water

Method:
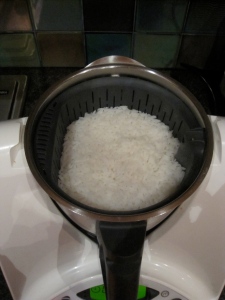
1) Place water in TM bowl.  Insert TM basket, zero scales & weigh desired amount of rice.
2) Cook 16/Varoma temperature/speed 4.

Note: If you’re cooking a large amount of rice (400g), you may need to cook for 20 minutes.  You can also go to speed 5 for the first 20-30 seconds, just so the water coats all of the rice.

Cooking Brown Rice

up to 400g brown rice
1200g water

Method:
1) Place water in TM bowl.  Insert TM basket, zero scales & weigh desired amount of rice.
2) Cook 35 minutes/Varoma temperature/speed 4.

Notes:

You can also rinse raw rice, once you’ve weighed it, to get off the excess starch.

Use the hook on your TM spatula to remove the rice basket after it’s been cooked, as it will be hot!
IMG_5129

Salmon Veloute

IMG_5035

I make this dish at ‘Varoma’ demonstrations & I’m often asked for the recipe.  This recipe is in the latest edition of the Everyday Cookbook, but I thought by breaking down the recipe & including photo’s with some steps, it might inspire more of you to make it.  This is a great family meal, but will be sure to impress at your next dinner party.  If you’ve been to one of my Varoma demo’s, you would know that the salmon is cooked perfectly, with very little ‘fishy smell’.  The soup too is delicious & so creamy.  In fact, you wouldn’t believe there is no cream in the soup.  That’s the amazing Thermomix blades doing what they do!

I will often make this dish for my family & freeze the soup in a few portions to have for lunch at a later date.  The baking paper on the Varoma day is fantastic!  It makes for very little washing up & if someone doesn’t like seafood, the juices from the salmon won’t drip into the vegetables or soup.   Even if I don’t make the whole Veloute meal with the soup & sauce, I’ll often cook a fillet of salmon or rockling for my kids dinner in this way, which takes about 15 minutes!  See recipe notes for the chicken variation for this dish.

Ingredients:
1 onion
1 clove garlic
20g olive oil
500g boiling water
1 tbsp vegetable stock concentrate
2 leeks
370g potatoes
2-3 zucchinis
2-3 carrots
4 skinless salmon fillets
Fresh dill
2 tbsp creme fraiche or sour cream
2 tsp dijon mustard
salt & pepper to taste

Method:
1) Place onion & garlic in TM bowl, chop 3 seconds/speed 7.
2) Scrape down the side of the bowl. Add oil, cook 2 minutes/100 degrees/speed 1.
3) Add stock concentrate & boiling water to TM bowl. Place chopped potatoes & then chopped leeks into the TM basket & insert basket into TM bowl.

IMG_5018
4) Place a piece of baking paper on Varoma tray & place salmon fillets on paper. Top with the dill & season to taste.

IMG_5021

                  5) Place Varoma into position, cook 11-14 minutes/Varoma temperature/speed 3.
6) Using a potato peeler, peel carrot & zucchini into long ‘tagliatelle’ strips.

IMG_5023
7) Place vegetable strips into the Varoma dish, cook 5 minutes/Varoma temperature/speed 2. (Salmon is still cooking on the tray).
8) Check that the salmon is cooked. Set aside with the vegetables in a Thermoserver to keep warm.

IMG_5027
9) Using the hook on your TM spatula, pick up the TM basket & pour the leek/potato mixture into the TM bowl, with the reduced water/stock/onion.

IMG_5029
10) Puree 1 minute/speed 9 (gradually increasing the speed to 9). Transfer soup to another thermoserver or bowl, but leave enough soup in the bowl to just cover the bend in the blades.

IMG_5030
11) To make the Veloute sauce, add creme fraiche or sour cream & mustard to TM bowl, along with a generous amount of salt & pepper. Blend 10 seconds/speed 3.
12) Serve soup as entree or refrigerate/freeze for lunch another day. Serve vegetables, topped with salmon & pour over sauce.

Notes:

This dish can be made with Chicken tenderloins instead of salmon.  Top the chicken with thyme, oregano or tarragon (instead of dill) & cook for  17-20 minutes in step 5.

Curried Pumpkin & Lentil Soup

Pumpkin & lentil soup

This soup has been a winter favourite of mine for many years.  I found this recipe on ‘Forum Thermomix’ not long after I purchased my machine.  It was posted by a lady named Chelsea & it’s had over 13,000 views over 4 years!  The thing I love most about this soup is the ingredients are things that I usually have in my fridge or pantry all the time.  I’ll often decide to make this for lunch at midday & it’s on the table by 12.30pm.  It’s also great for entertaining – this is thick, hearty soup & will easily feed 4 adults for lunch, served with some crusty bread.

Ingredients:
1 onion, peeled & halved
1 clove garlic
30g olive oil
1 tsp curry powder (or to taste)
700g butternut pumpkin, roughly chopped
100g dried red lentils
1 tbsp vegetable stock concentrate
650g water
Natural yoghurt or sour cream, to serve

Method:
1) Place onion & garlic in TM bowl, chop 3 seconds/speed 5.
2) Scrape down the sides of the bowl, add oil & cook 2 minutes/100 degrees/speed 1.
3) Add curry powder, cook 1 minute/100 degrees/speed 1.
4) Add pumpkin, chop 8 seconds/speed 5. Scrape down the sides of the bowl.
5) Add lentils, stock concentrate & water. Cook 20 minutes/100 degrees/speed 1.
6) Blend for 1 minute/speed 9 (gradually moving the dial up to speed 9).
7) Season to taste & serve with a dollop of natural yoghurt or sour cream.

Raisin Bread

IMG_1063

I now make this raisin bread once every week.  Trust me, once you try this, you won’t want to buy it from the supermarket anymore.    Firstly, this tastes so good & doesn’t compare to store bought raisin bread.  Secondly, this bread costs about $1.50 per loaf to make, even less if you buy your bakers flour in bulk like me.   It’s also very easy to slice & freeze, as you will see from the photo’s I’ve included in this post.   This dough is a little sticky, so you will need to give your blades a good clean after, so I’ve included a few cleaning tips in the notes.

Ingredients:
100g sultanas, soaked in water (and/or raisins, craisins or other dried fruit)
300g water
1 sachet yeast or 2 tsp dried yeast
20g olive oil
1 tsp sea salt
500g bakers flour
60g brown sugar
2 tsp ground cinnamon
1 tsp mixed spice

Method:
1) Place sultanas into a bowl & cover with water, allow to soak for 5 minutes.
2) Zero scales & weigh 300g water into TM bowl. Add yeast & heat for 1 minute/37 degrees/speed 1.
3) In this order add flour, oil, salt, sugar & spices. Mix 6 seconds/speed 6. Then knead for 2 minutes.
4) Drain sultanas & add to dough in TM bowl. Knead for 1 minute.
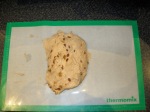
5) Transfer dough onto Thermomat & work into a ball. Allow to prove in a warm place for 30 minutes or until double in size (see before & after proving photo’s below).

IMG_4657

IMG_4660

6) Pre heat oven to 200 degrees. Knock back the dough & place into a greased or lined loaf tin. Allow to prove in a warm place for a further 20 minutes.  See photo’s below how much the dough rises again in 20 minutes.

IMG_4661

IMG_4662
7) Bake for 25 minutes or until golden brown.
8) Allow bread to cool thoroughly, before removing from the loaf tin & slicing.  I will often leave my bread to cool all day or overnight before slicing.  Bread can be frozen in a freezer bag & slices taken for toasting as desired.

IMG_4665

IMG_4666

Notes:

To clean the blade after making the dough, add some cold water to the bowl (enough to cover the blades) & a squirt of dishwashing liquid.  Please bowl back on your machine & turbo a few times.  This will release most of the dough.  You will find that you still need to remove the blade to give it a good clean though.  I use a baby’s bottle/teat brush for this.

You can substitute the brown sugar in this recipe with 60g of honey.  I prefer using the sugar, as the honey makes the dough even stickier & it can stick to the Thermomat & inside the bowl/blades.

To prove my dough, I simply place boiling water in my Thermoserver & sit my Thermomat on top.  The heat that comes through the lid is enough for proving.

IMG_4998

Banana & Choc Chip Muffins

IMG_1514

One of the many things I love about my Thermomix is that I can make muffin, biscuit & cake batters in a matter of minutes.  This particular recipe takes less than 1 minute.  The other bonus is that I’m only cleaning 1 bowl too!  I made these muffins one morning last week in a variety of sizes – some to take to a morning play date, some sizes to freeze for Sophie’s kinder snack box & some little ones for Lucy.  My 4yo is such a fussy eater & she’s not that interested in food at all.  Even if there’s cake, she’ll usually lick off the icing & leave the rest.  You can imagine my delight when she actually ate these muffins!  They freeze really well, so are great to place frozen into lunch boxes, as they’ll defrost by recess or lunch time.  I took a few in a zip lock bag to the shops last week & the girls enjoyed their special snack.

Ingredients:
3 bananas
300g plain flour
10g baking powder
220g caster sugar
2 eggs
60g vegetable oil
250ml buttermilk
10g vanilla extract
140g dark chic bits
Icing sugar for dusting

Method:
1) Pre heat oven to 180 degrees.
2) Add bananas to TM bowl, mash 5 seconds/speed 7.
3) Add remaining ingredients (except for chic bits) & mix 10 seconds/speed 5. Scrape down the sides of the TM bowl & mix again 10 seconds/speed 5.
4) Add choc bits & mix 10 seconds/reverse/speed 4.
5) Divide the mixture into patty cases or muffin moulds.
6) Bake 25-30 minutes or until golden.
Place on a wire rack to cool & dust with icing sugar.

Chicken, Lemon & Pea Risotto

IMG_5085

I’ve adapted this recipe from a Donna Hay cookbook – Off the Shelf.  Her’s is a baked risotto & I’d been making it for years before I got my Thermomix.   I love the freshness of Donna Hay recipes & this risotto has lovely fresh flavours, especially from the lemon & mint.

I don’t eat seafood myself, so that’s why there are so many chicken recipes on my blog.  This recipe can easily become a Prawn, Lemon & Pea Risotto.  Simply replace the chicken thigh with 300g green prawns, that have been peeled & tailed.   Follow this recipe up to step 7, but don’t add the chicken.  Then at step 8, cook the risotto for 11 minutes (instead of 14 minutes), then add the prawns & cook for 3 more minutes at the same temperature/speed as this recipe.

Ingredients:
40g parmesan cheese
large handful mint
Zest of 1 lemon
Juice of 1 lemon
1 leek, roughly chopped
40g butter
40g olive oil
320g arborio rice
60g white wine
250g chicken thigh or breast, cubed
1 tbsp vegetable stock concentrate
720g water
120g frozen peas

Method:
1) Place parmesan cheese in TM bowl, grate 10 seconds/speed 10. Set aside.
2) No need to clean & dry TM bowl, however wipe excess cheese from bowl with paper towel.
3) Add lemon zest to TM bowl (I peel lemon using a potato peeler). Grate 10 seconds/speed 10.

4) Add leek, chop 3 seconds/speed 5.
5) Scrape down the sides of the bowl, add butter & oil, saute 3 minutes/120 degrees/speed 1.
6) Insert Butterfly Whisk (optional). Add rice, cook 1 minute/120 degrees/reverse/speed 1.5 (without MC)

7) Add wine, saute 2 minutes/Varoma/reverse/speed 1.5 (without MC).  Scrape bottom of TM bowl well with spatula to loosen rice.
8) Add stock, chicken & water.  Cook 13 minutes/100 degrees/reverse/speed 1.5.   Place simmering basket on top of lid & weigh in frozen peas (peas will defrost as the risotto cooks).

9) Pour peas into Thermo Server with risotto, reserved parmesan, mint & lemon juice.  Stir to combine.

10) Allow to rest for 10 minutes before serving.  (rice will continue to cook during this resting period).

Notes:

I use herb scissors to chop the mint.  Instead, you can add the mint with the parmesan in step 1 & grate them together. 

054

In step 8, simmering basket is on the lid, to allow the risotto to evaporate & to defrost the peas.

IMG_4827